
Much of this content is credited to Craig Wende, goalie for the NLL Georgia Swarm and Team Germany. It has been created from that shared by Craig at a goalie clinic held in Dresden as part of the Germany Lacrosse Convention in May 2022.
- Box Lacrosse Goalie 101
- Stance
- Positional Zones
- Saving Corner Shots
- Making 5-Hole Saves
- Saving Dunks Shots From Behind
- Crease Rules
- Clearing
- Pull The Goalie
- Now Watch
Box Lacrosse Goalie 101
Watch this short video with Aaron Bold, who explains some of the goalkeeper equipment.
Stance
A good stance, making yourself as big as possible within the goal, but still able to move, is essential.
Your feet should be at least shoulder width apart, or a little wider if comfortable.
If your legs are too wide apart it will open up the 5-hole and hinder your ability to move side-to-side.
If your legs too close, while this may fully close off the 5-hole, it will expose too much goal either side of you at each post.
The goalie stick should be almost vertical with pointing head down between your legs. The shaft goes under your armpit. Many box goalies use a long shaft so that there is no risk of the butt-end of the shaft getting caught up in the jersey.
The head of the stick should be touching the ground, just in front of your toes. Apply light pressure down on the stick so you can feel the ground but do not lean on the stick.
Your legs should be slightly bent with your bum pushed out behind you. Imagine you are sitting on the edge of a chair. The amount you need to sit down will depend on your height. The top of your shoulder pads should be level with the goal cross bar. A shorter goalie may be able to stand taller. A tall goalie will need to sit lower. There is no point having your shoulders above the cross bar, as shots going above the goal are not going to score.
Positional Zones
There are three primary positions for a goalie, depending on the location of the offensive ball carrier. Some goalies use five positions but for this tutorial we will keep it to three. The floor around the goal is mentally divided into three zones.
Zone 1 & 3 are each side of the goal, from goal line extended to about 45 degrees each side of the goal. Zone 2 is the 90 degree arc in front of the goal.
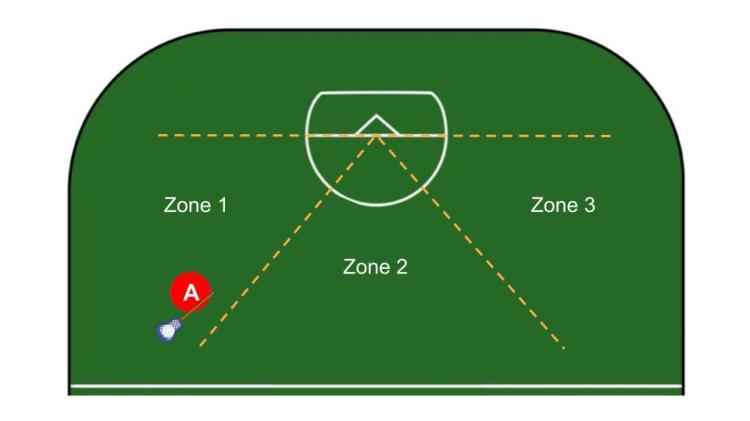
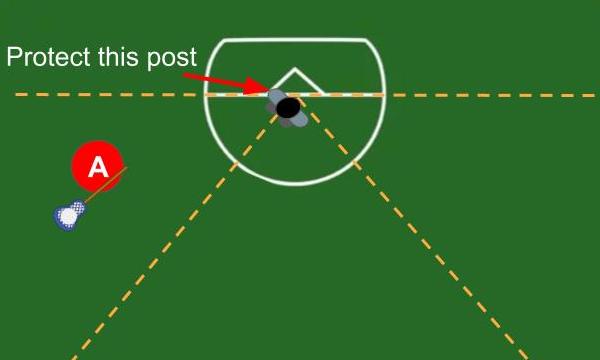
When the ball is in Zone 1, place your right foot against the right post and keep it there. Your primary objective is to protect the right / nearside post. Position your body square to the ball, rotating your body as the ball moves left and right. You are giving the attacker only one shooting option – to the far side post.
As the ball moves into Zone 2, shots from this area on the floor that are the most difficult to save as both posts will be open. To counter this, take at least half step forward to narrow the angles. Get set in your stance and trust your position. That means don’t shuffle around. Every time you move as a box goalie, you are unbalanced and not set to block a shot.
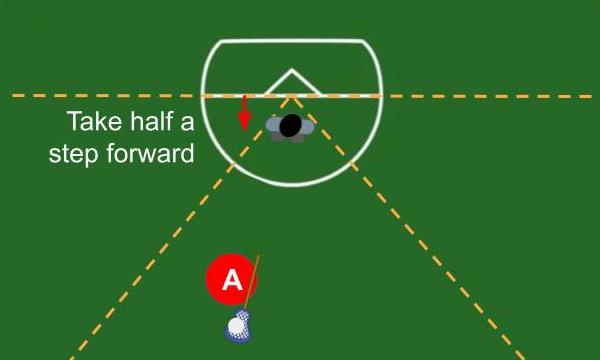
How far you step forward when in Zone 2 depends on your athletic ability to step back to protect a post if the balls moves into Zone 1 or 3. The further forward you are you narrow the shooting angles but also leave room behind you for shots coming from attackers at the goal line extended. The ball can move so fast from a player directly in front of you in Zone 2 to a player on either post. You need to be able to step back into the Zone 1 or 3 position with a single step.
When the ball moves into Zone 3, it’s the mirror of Zone 1. Place your left foot against the left post and protect that post, only giving up the right / far side post.
Saving Corner Shots
When positioned on Zones 1 or 3, the likely shot is going to be to the open top or bottom corner of the goal. You have protected the nearside post so you are ready to react to this shot.
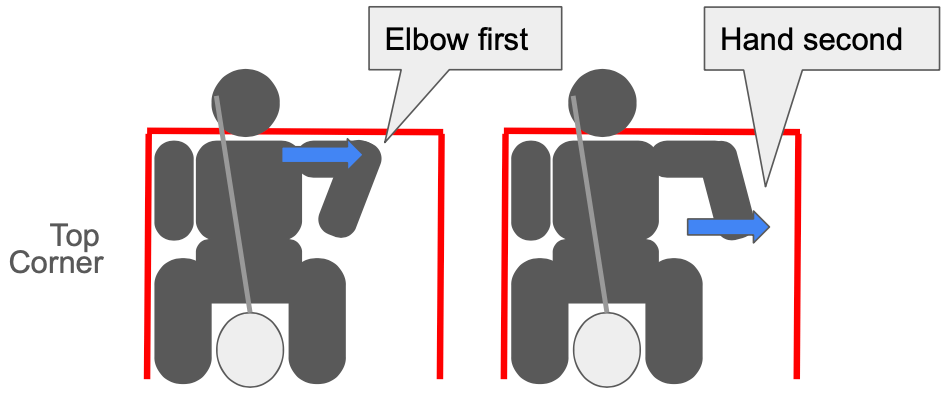
For a top corner shot, your elbow moves first, followed by your hand. The goalie glove has significant padding on the non-palm side. Don’t even think about catching the ball. Just block it.
For a bottom corner shot, your knee moves first, followed by your feet. This is a much harder move to perfect as can feel unnatural. The knee moves first as this forces your hips and body to move across.
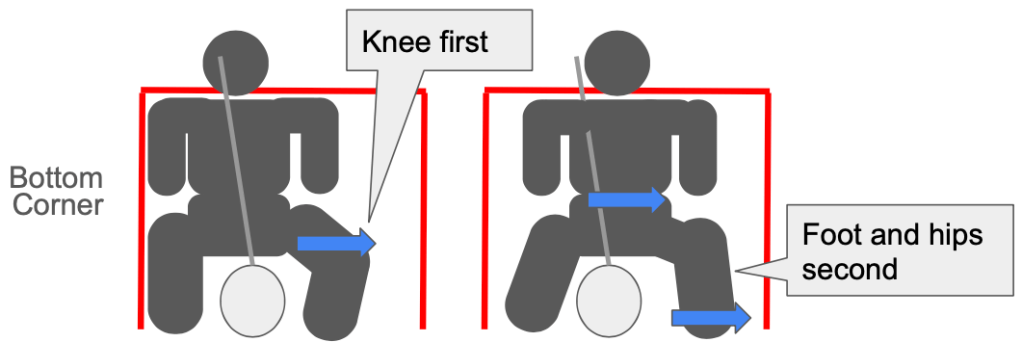
If only your foot moves across, in a kicking motion to the bottom corner, you may save a low shot but the middle of the post will remain open until you make a secondary motion with the knee and hips.
Making 5-Hole Saves
When you are in the correct stance, there will be gaps around your stick head and your leg pads. This area is known as the “5-hole” as per the number 5 on a dice.
When a shot comes at the 5-hole, keep your feet planted, and be able to move the stick head left or right in front of your leg pads. At the same time, sink into your stance to protect the gap above the stick head and below your waist/shorts. Try to avoid lifting the stick. Many goals go under a goalies stick, especially if the shooter first fakes a high shot, temping the goalie to stand up, then they shoot low.

Saving Dunks Shots From Behind
The attacking ball carrier may either take the ball behind the goal, or receive a pass from behind the goal. In many cases, they are looking to score from a dunk shot.
The first rule is NEVER turn around and face the player. You have no padding on your rear so any quick pass and shot from in front of the goal is going to hit you and hurt. Keep your body facing forward and turn your head to see the attacker with the ball.
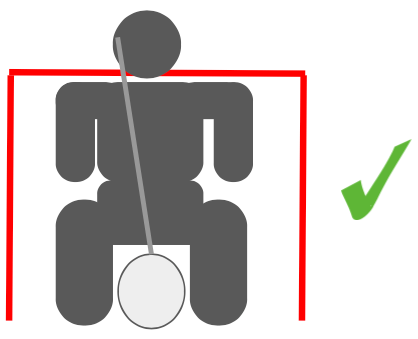
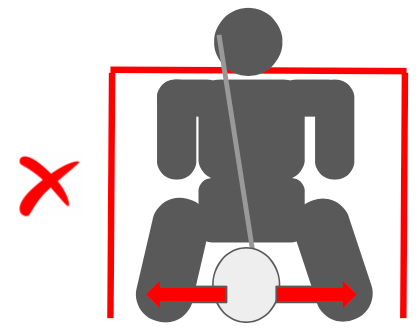
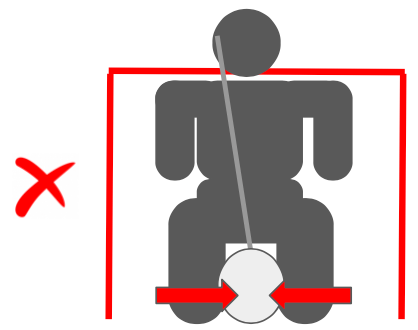
Your goalie position now depends on if the attacker is a left or right handed player. A right-handed attacker will almost always prefer to dunk to the left (your left) of the goal. A left-handed dunker will almost always prefer to dunk to the right (your right) of the goal.
The image on the left below would be for a left-handed dunker. The image on the right below would be for a right-handed dunker.
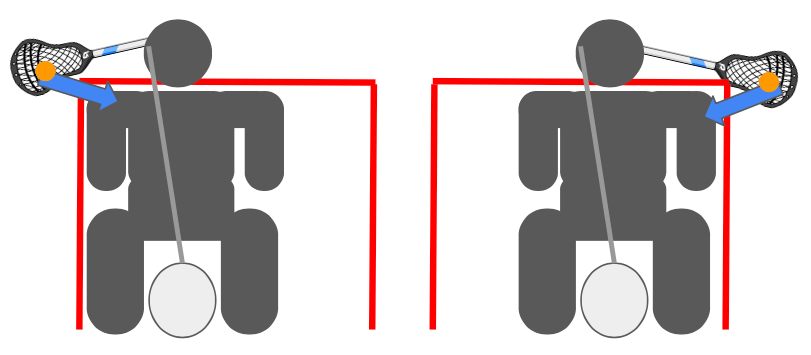
Hug the top corner with your shoulder and get your leg against the post. Many goalies will also extend their free arm along the cross bar. An experienced attacker will try to fake the goalie and first look to dunk on the opposite side, getting the goalie to move across. Hold your position until you are certain they have committed to trying a dunk from the much more difficult other side.
Crease Rules
The 9’3″ goalie crease area is your safe haven. Your defenders can run through your crease and they will run around you.
An attacker without the ball can step into the crease provided it is not part of, or results in an attacking play. For example, if the ball is down the floor, an attacker may step in/through the crease. However if an attacker gets an advantage but running through the crease, then receives a pass, even if now outside the crease, the referee will whistle for a crease violation.
No attacking player in possession of the ball can have any part of their body in the crease. In the act of shooting, if the ball cross the goal plane (resulting in a goal), then any subsequent body part touching the crease area is OK. This allows for diving shots with the attacker diving across the crease, looking to score before they step/fall into the crease.
An attacker entering the crease in the act of shooting cannot target the goalie. They must set their direction across the crease. The simple guide here is that if an attacker makes contact with you in the crease, the referee should call at least goalkeeper interference and a turnover. If there was clear intent by the attacker to make contact with the goalie then they will be seeing the penalty box. An exception would be if the attacker was pushed into the goalie by a defender. A minor penalty would be against the defender who made the push.
When the ball is on the floor outside the crease, it’s a free ball and can be challenged. When you have raked the ball into the crease and has either covered it, or picked it up, nobody can challenge for that ball.
When you have the ball in your stick and both feet in the crease, nobody can touch you or your stick.
If you leave the protection of the crease, with or without the ball, you are treated the same as any other player, so can be checked, bumped etc. A goalie may sometimes move behind the goal to either block or check an opponent. Ensure any contact is made between the hips and shoulders. If the attacker does not have the ball and you want to block him, clearing some space for your defender to pick up the ball, or clear up-field with the ball, use as little force as required to block him. You, and your goalie pads, are massive so in most cases just standing in his way will to the trick. If you flatten an opponent when they do not have the ball, you will probably pick up a penalty.
If a goalie receives a minor or major penalty, the team’s nominated defender serves the penalty time.
Clearing
You have made the save and the ball is now in your stick. Just like in field lacrosse, you now have four seconds to either clear the ball, or step out of the crease.
Your first look shall be to the non-bench wing. A team will always try to transition the ball along the non-bench side. One defender will be looking for the pass as the other four defender hit the bench to allow the attack to take to the floor.
Once the ball is safely in the attack. Have a breather. Many goalies find resting their arms across the goal cross bar a relaxing position.
Pull The Goalie
A coach may decide to “pull the goalie” meaning you sprint (shuffle) off allowing a 6th attacker on the floor, giving a man advantage. It generally only happens in close games when either;
- a delayed penalty is called against the opposition. If the opposition get the ball, it will be whistled dead.
- your team is behind with minimal time remaining in the game and your attack has possession.
Make sure you know how your coach will signal this. Be aware of the game score and time remaining so that you can anticipate it.
Now Watch
Here is a short compilation video from 2017 highlighting just goalie saves. Watch the goalie move between the three zones, save high shots with his shoulder, and low shots with his hands and/or leg pads.
